| Tutorial: GettingStarted with Code::Blocks | |||||||||||||||
|
 Before we can look at the code and the SoftPixel Engine API we have to setup our IDE. In this tutorial we will setup the Code::Blocks an open-source IDE. But first of all we need the latest GNU C++ compiler because the Code::Blocks download package does not deliver any compilers. So we have to download the compiler additional. We use the Windows version of the GNU C++ compiler called "MinGW" (Minimalist GNU for Windows) which can be downloaded at mingw.org or directly at the download site on sourceforge.net. Install the compiler and we can go on.
After installing the latest version of MinGW we can download the Code::Blocks IDE at
codeblocks.org or directly at the
download site (Meantime Code::Blocks is available
including MinGW as well). Install it and we can setup the IDE to make it ready for the SoftPixel Engine.
But before that we need to download the boost C++ library which has been
integrated to the engine since version 3.1. This is a well known and very powerful extension library for C++.
Usually the library must be compiled by yourself but in our case we only need the header files (i.e. some of the boost templates).
I used boost v.1.47.
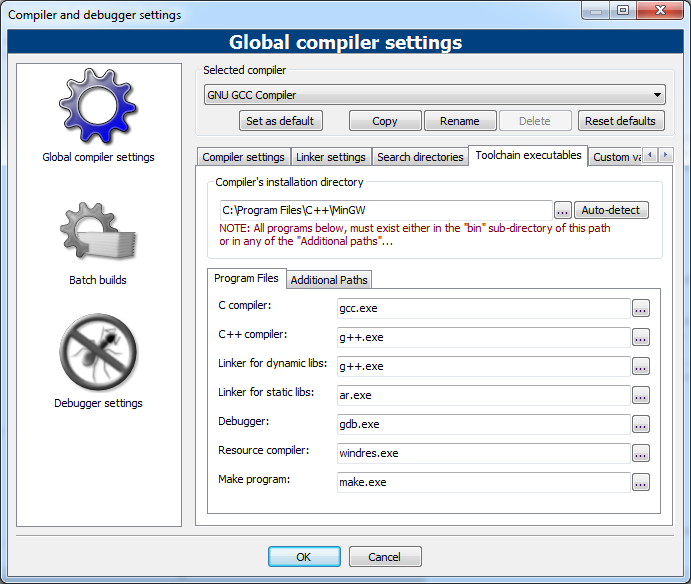
 Now the IDE knows where the compiler, debugger, linker etc. are. Normally you can also write programs withoug an IDE. But then you need to write your own makefile or write an extremely large command line. The IDE assumes a lots of work for each compilation process. The next step is to setup the include directories that the compiler knows where the standard header files are. Normally you need at least one include directory. Even the directory which is included in the MinGW download packaged (e.g. "C.\Program Files\C++\MinGW\include"). In our case we also need the include directory of the SoftPixel Engine SDK (e.g. "C:\Program Files\SoftPixelEngine\include") and the boost library (e.g. "C:\Program Files\boost_1_47_0"). Here is an example image:
 Now we can start with a new project. Go in the meun to "File"/ "New"/ "Project...". Click the "Empty project" category. Here is an example image:
 Click on the "go" button, skip the next site and then fill out the string fields in the third site. As an example I filled out the string fields as follows:
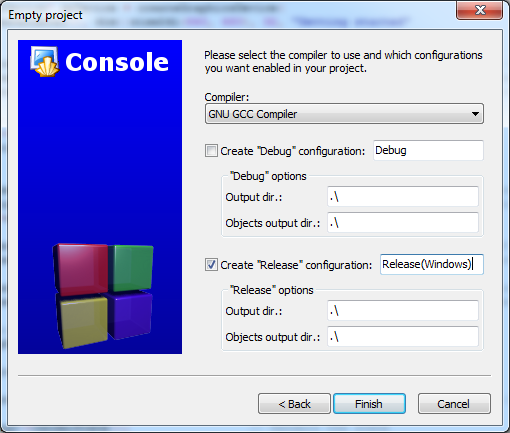
 For this example we only want a release target so you can fill out the last site as follows:
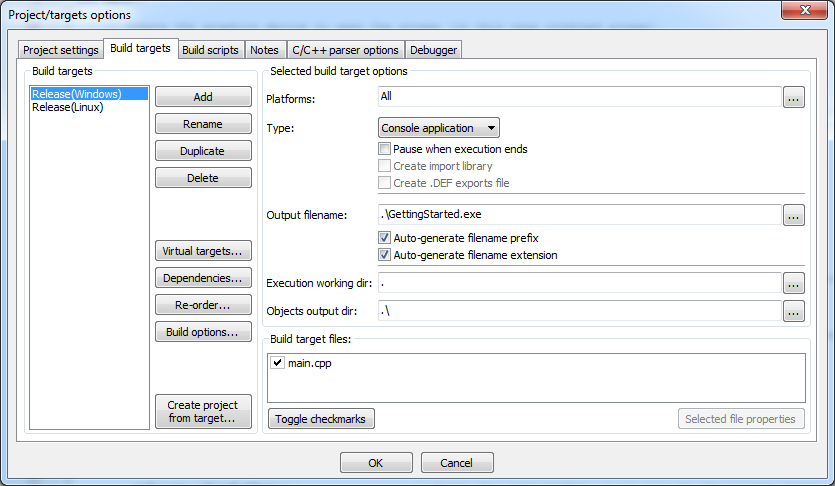
 After allocating a new Code::Blocks project we can create the "main.cpp" file in the example folder we chose. Then go in the menu to "Project"/ "Add files..." and add the "main.cpp" file to the project. Then there should be an entry in the project file list on the left side in the IDE. Code::Blocks creates a "Sources" folder where the file stored. This is not a folder on your disk but for the IDE which takes care of a good overview about our files when you have large projects. Now there are only still two things to configure. Go in the menu to "Project"/ "Properties..." and go in the tab "Build targets". You can create several build targets e.g. one for the release and one for the debug version. Click on the "Add" button in the frame "Build targets". Enter a name and click "OK". Then choose in the category "Type" the type of application. We use "Console application". We also disable the option "Pause when execution ends". You can set the output filename, too. Here is an example image:
 The last conifugration we need to do is to link the "libSoftPixelEngine.a" file to our project. Go in the menu to "Project"/ "Build options..." and click the tab "Linker settings". Then click the "Add" button in the frame "Link libraries". Choose the library file in the "lib\Win32-gcc\" folder on the SDK. Here is an example image:
 Now we finished to setup our IDE! Next comes the code. The first line is just a comment that other users and you too know what the program is about ("SoftPixel Engine - Getting started"). Next thing is no C++ command but a C preprocessor directive to include the main header of the SoftPixel Engine. Because we setup the IDE for default include directories we do not need to write the full path (#include "C:\Program Files\SoftPixelEngine\include\SoftPixelEngine.hpp"). We only need to write (#include <SoftPixelEngine.hpp>). Be aware of the difference with "" and <>!
The following line declares that we do not write always "sp::" before each SoftPixel Engine member. Otherwise we need to write e.g. "sp::f32", "sp::dim::vector3df", "sp::Random" etc. You can also disable the other namespaces which are "io" (for Input-Output functions), "dim" (for dimensions like vectors, matrices etc.), "math" (for mathematical processes like sine, cosine etc.), "video" (for video renderer, textures etc.), "scene" (for scene management, collision-detection etc.), "tool" (for extended tools like the integrated lightmap generator).
The main function is part of each C++ program and not further explained.
Then the first SoftPixel Engine function is called. "createGraphicsDevice" creates the main window, video screen, device context etc. (Until version 1.9 this function was called "createDevice" but changed with version 2.0 which this example is for). The function returns the SoftPixelDevice pointer which is needed for further operations. The first parameter specifies which render system shall be used. The supported render system are OpenGL (RENDERER_OPENGL), Direct3D9 (RENDERER_DIRECT3D9) and a Direct3D11 (RENDERER_DIRECT3D11). For mobile platforms there are also OpenGL|ES 1.1 (RENDERER_OPENGLES1) and OpenGL|ES 2.0 (RENDERER_OPENGLES2). Second parameter defines the screen size. For example we use a small size of 640 * 480 pixels. Then the color depth (in bits) follows. We use 32 bits because the most current personal computers should support this configuration. The following parameters are optional. We set the window title to "Getting started". By default the full program's filename is used. An additional parameter which is currently not used in this example is a boolean to enable or disable fullscreen mode. Add a new value of 'true' to use fullscreen mode. By default window mode is used. For more information about the parameters for this function take a look at the API documentation.
After creating the graphics device we allocate some other control objects. One for video- and one for scene management and one for input control.
Now we can create objects, lights, cameras, billboard, terrains etc. At first we create a camera otherwise we would see nothing. More over the scene can be handled much more better using a camera object. If you work with pure OpenGL you have to translate each object in the inverse camera's position because in OpenGL there is no camera. But with the SoftPixel Engine those things are really easy ;-).
Next thing is lighting. We can do without lighint but the scene looks better with this effect. So we create a light and activate lighting system. The most graphics cards only supports 8 lights but the SoftPixel Engine can handle much more light objects. If the count of light objects are more than 8 the engine sorts the list of lights in dependent of distance from the object to the active camera.
Now we create a mesh. Meshes in the SoftPixel Engine represent the 3D objects (or rather models). Until version 1.9 there were called Entities (scene::Entity) but since version 2.0 there are called Meshes (scene::Mesh). There are several ways to create or load meshes. To learn more about how a mesh is structured take a look at the API documentation.
We finished scene creation and we can define the main loop. The "updateEvents" function updates all window events and refreshs the window callback status. We also check if the user pressed the escape key. If so the program shall ends.
Inside the loop block we do not have to do so much. The first thing we do is to clear the video buffer (Color- and Depth buffer). If you want to clear only the color buffer you can set the parameter to "BUFFER_COLOR". By default the value is "BUFFER_COLOR | BUFFER_DEPTH". There is also the stencil buffer "BUFFER_STENCIL" but not further explained in this tutorial.
Now let's turn the object to have a simple animation. The "turn" function and some others can be used for each object type which is a child from the "Node" class. In this class several basic functions and members are defined like the 3D position, rotation, parent system etc.
Now the time has come the render the whole scene. Sure, this scene is really small (just exist of our primary object) but if the scene becomes larger the render method does not change. Only call "renderScene" to render the whole scene for each camera. If you want to render the scene for only one camera use the second "renderScene" function which expects a camera object.
After rendering the scene or drawing something you will see not more than before. Because each drawing operation has been drawn into the backbuffer which is not shown to onto the screen. To see what you've drawn flip (or rather swap) the buffers using the "flipBuffers" function. This function effects that the video buffer is shown onto the screen finally.
Now we come to the end. We close the block of the main loop, delete the device and return from the main function. The "deleteDevice" function deletes all allocated objects, textures etc. Don't forget to call this function otherwise your program will occur a 'memory-leek' or will crash.
That's about it ;-). I hope you understood all I tried to explain and your program runs fine. To compile the program press "F9" (in Code::Blocks default configuration) or click in the menu "Build"/ "Build and run". If you have questions please join our community. |


